Modifying a Table Definition |
  
|
Modifying a Table Definition |
|
Prior to adding in table contents, or after removing all existing table contents, you can modify a Table Definition by:
•clicking on the table name field and changing its name (e.g. to ‘Base Rate 3’),
•double clicking on the Name field within the Columns Pane to change the column name,
•adding a new column,
•deleting an existing column
•changing the column type selection (from ‘Key’ to “Data’ or vice-versa)
•changing the Datatype
•changing the Ranged settings for Datatypes decimal, long, int, dateTime (ranging is not available for string and boolean datatypes).
Once table contents are present then only the following actions are permitted:
•changing the table name
•changing the column name
•changing the ranged settings
Tip |
There may be times after you have added contents to a table when you need to modify the definition of that table in a manner that is not permitted when table contents are present (i.e. to add a new column). To achieve this - export the table contents, then delete the table contents from the table, make the required table definition changes, and then re-import the table contents. If there is a significant change to the table definition then the table contents should be modified externally prior to being re-imported in order to be aligned to the modified table definition. |
We will show you how to perform the last two operations in three easy steps below:
STEPS to add a new Column
1. |
Open the Base Rate Table Definition that we created earlier (see Creating a Table Definition) by double clicking on the table name in the Explorer pane |
2. |
Double click on the first free field under the 'Rate Percent' column name (or right-click and select 'New') |
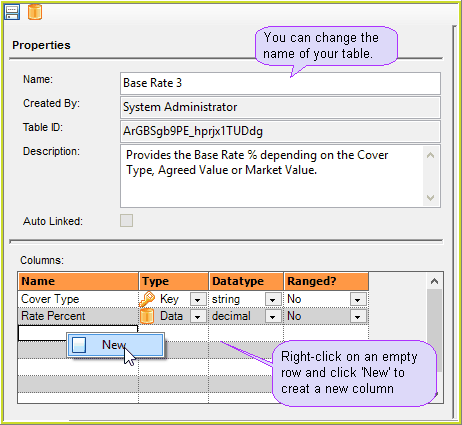
Figure 6-87: Adding a third column to the Base Rate Table Definition
3. |
Name the third column `Loading' and change datatype to decimal |
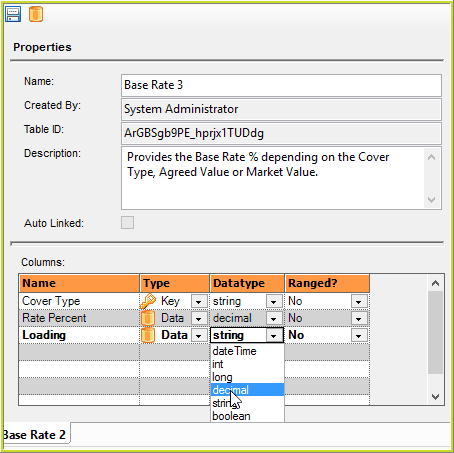
Figure 6-88: A third column, Loading, has been added to the Base Rate Table Definition
4. |
Click on the Save button to save your changes and update the Table Name in the explorer pane. |
STEPS to change the Ranged settings
1. |
Open the Table Definition form and select Key First or Range First, and Save |
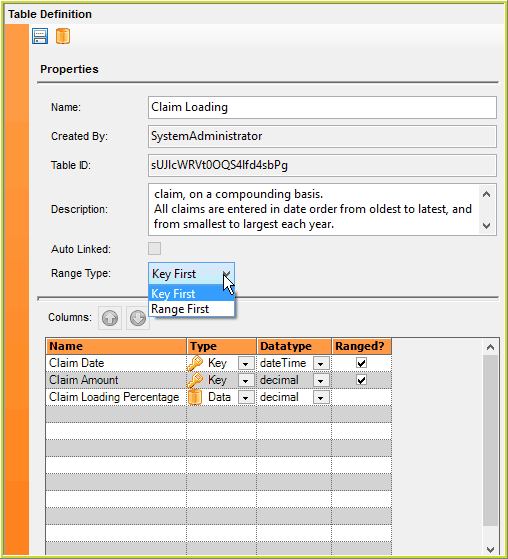
Figure 688(b) Key First or Range First option
STEPS to re-arrange the sort order of the table columns.
1. |
Open the Table Definition form and select a column name |
2. |
Click on the Columns: 'Up' or 'Down' arrows to move the column accordingly. |
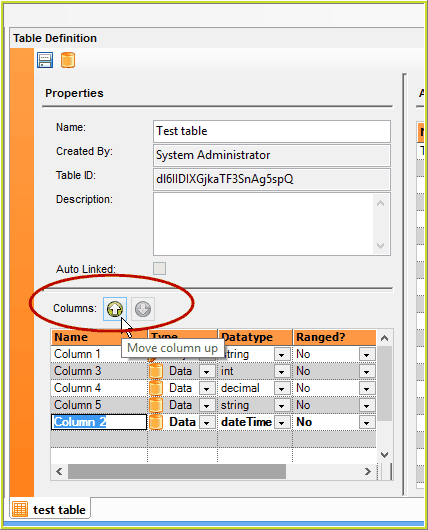
Figure 6-89: Repositioning a column sort order.
3. |
Click Save. The columns will be resorted when you open the corresponding Table Data screen. |
STEPS to delete a column.
1. |
Open the Base Rate Table Definition |
2. |
Right-click on the Loading column name that we created when adding a new column and select Delete |
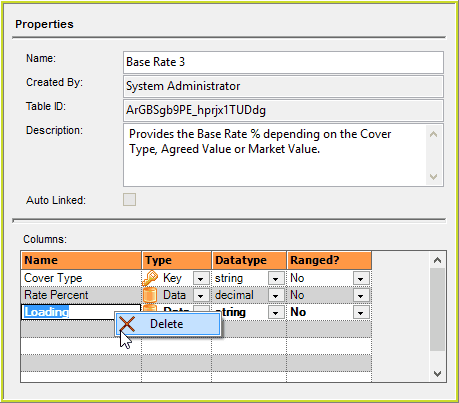
Figure 6-89: Deleting the Loading column from the Base Rate table definition
3. |
Click on the Save button. |